

Skalakan pengembangan visual Anda secara global tanpa kode backend.
Webflow adalah platform utama untuk pengembangan visual, tetapi lokalisasi bawaan bisa jadi rumit dan mahal. MultiLipi terintegrasi langsung ke arsitektur Webflow melalui satu injeksi skrip, yang secara instan mengubah halaman statis dan koleksi CMS Anda menjadi infrastruktur multibahasa dengan pengindeksan SEO penuh.
Panduan ini merinci proses integrasi menggunakan Kode Kustom fitur.
1. Prasyarat Penyebaran
Sebelum memulai, pastikan lingkungan Anda memenuhi persyaratan:
Paket Situs Webflow
Anda harus menggunakan Paket Situs Dasar (atau lebih tinggi) untuk membuka fitur "Kode Kustom".
Kunci API MultiLipi
Temukan ini di Dasbor Anda di bawah Pengaturan > Umum.
2. Langkah 1: Akses Arsitektur Situs
Kami akan menyuntikkan mesin terjemahan ke dalam header global untuk memastikan mesin tersebut tetap ada di semua halaman dan templat CMS.
- 1
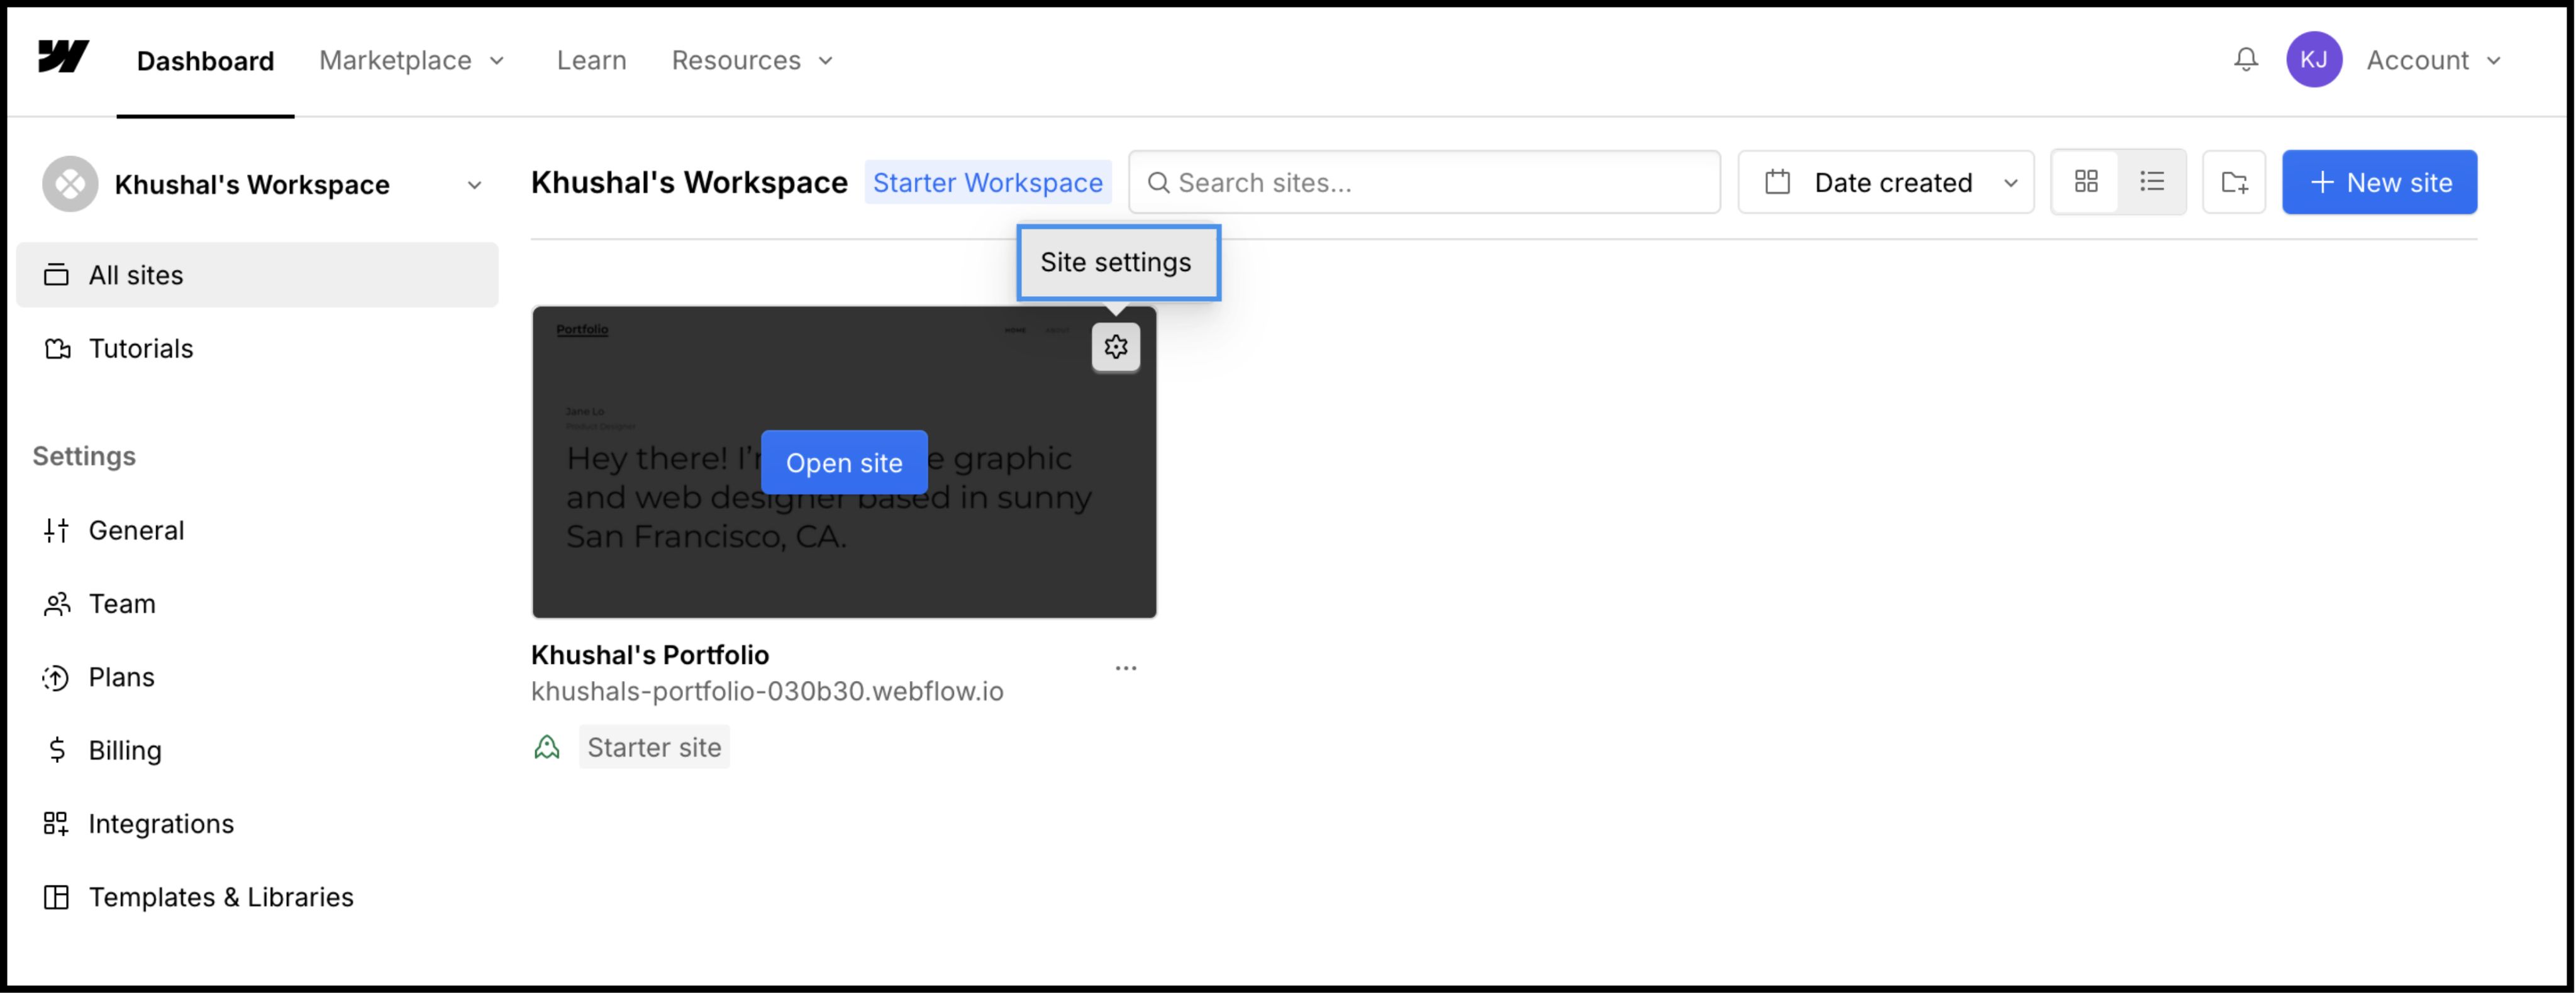
Masuk ke Dasbor Webflow.
- 2
Temukan kartu proyek Anda dan klik Ikon Pengaturan (⚙️) (atau pilih Pengaturan Situs dari menu Designer).
- 3
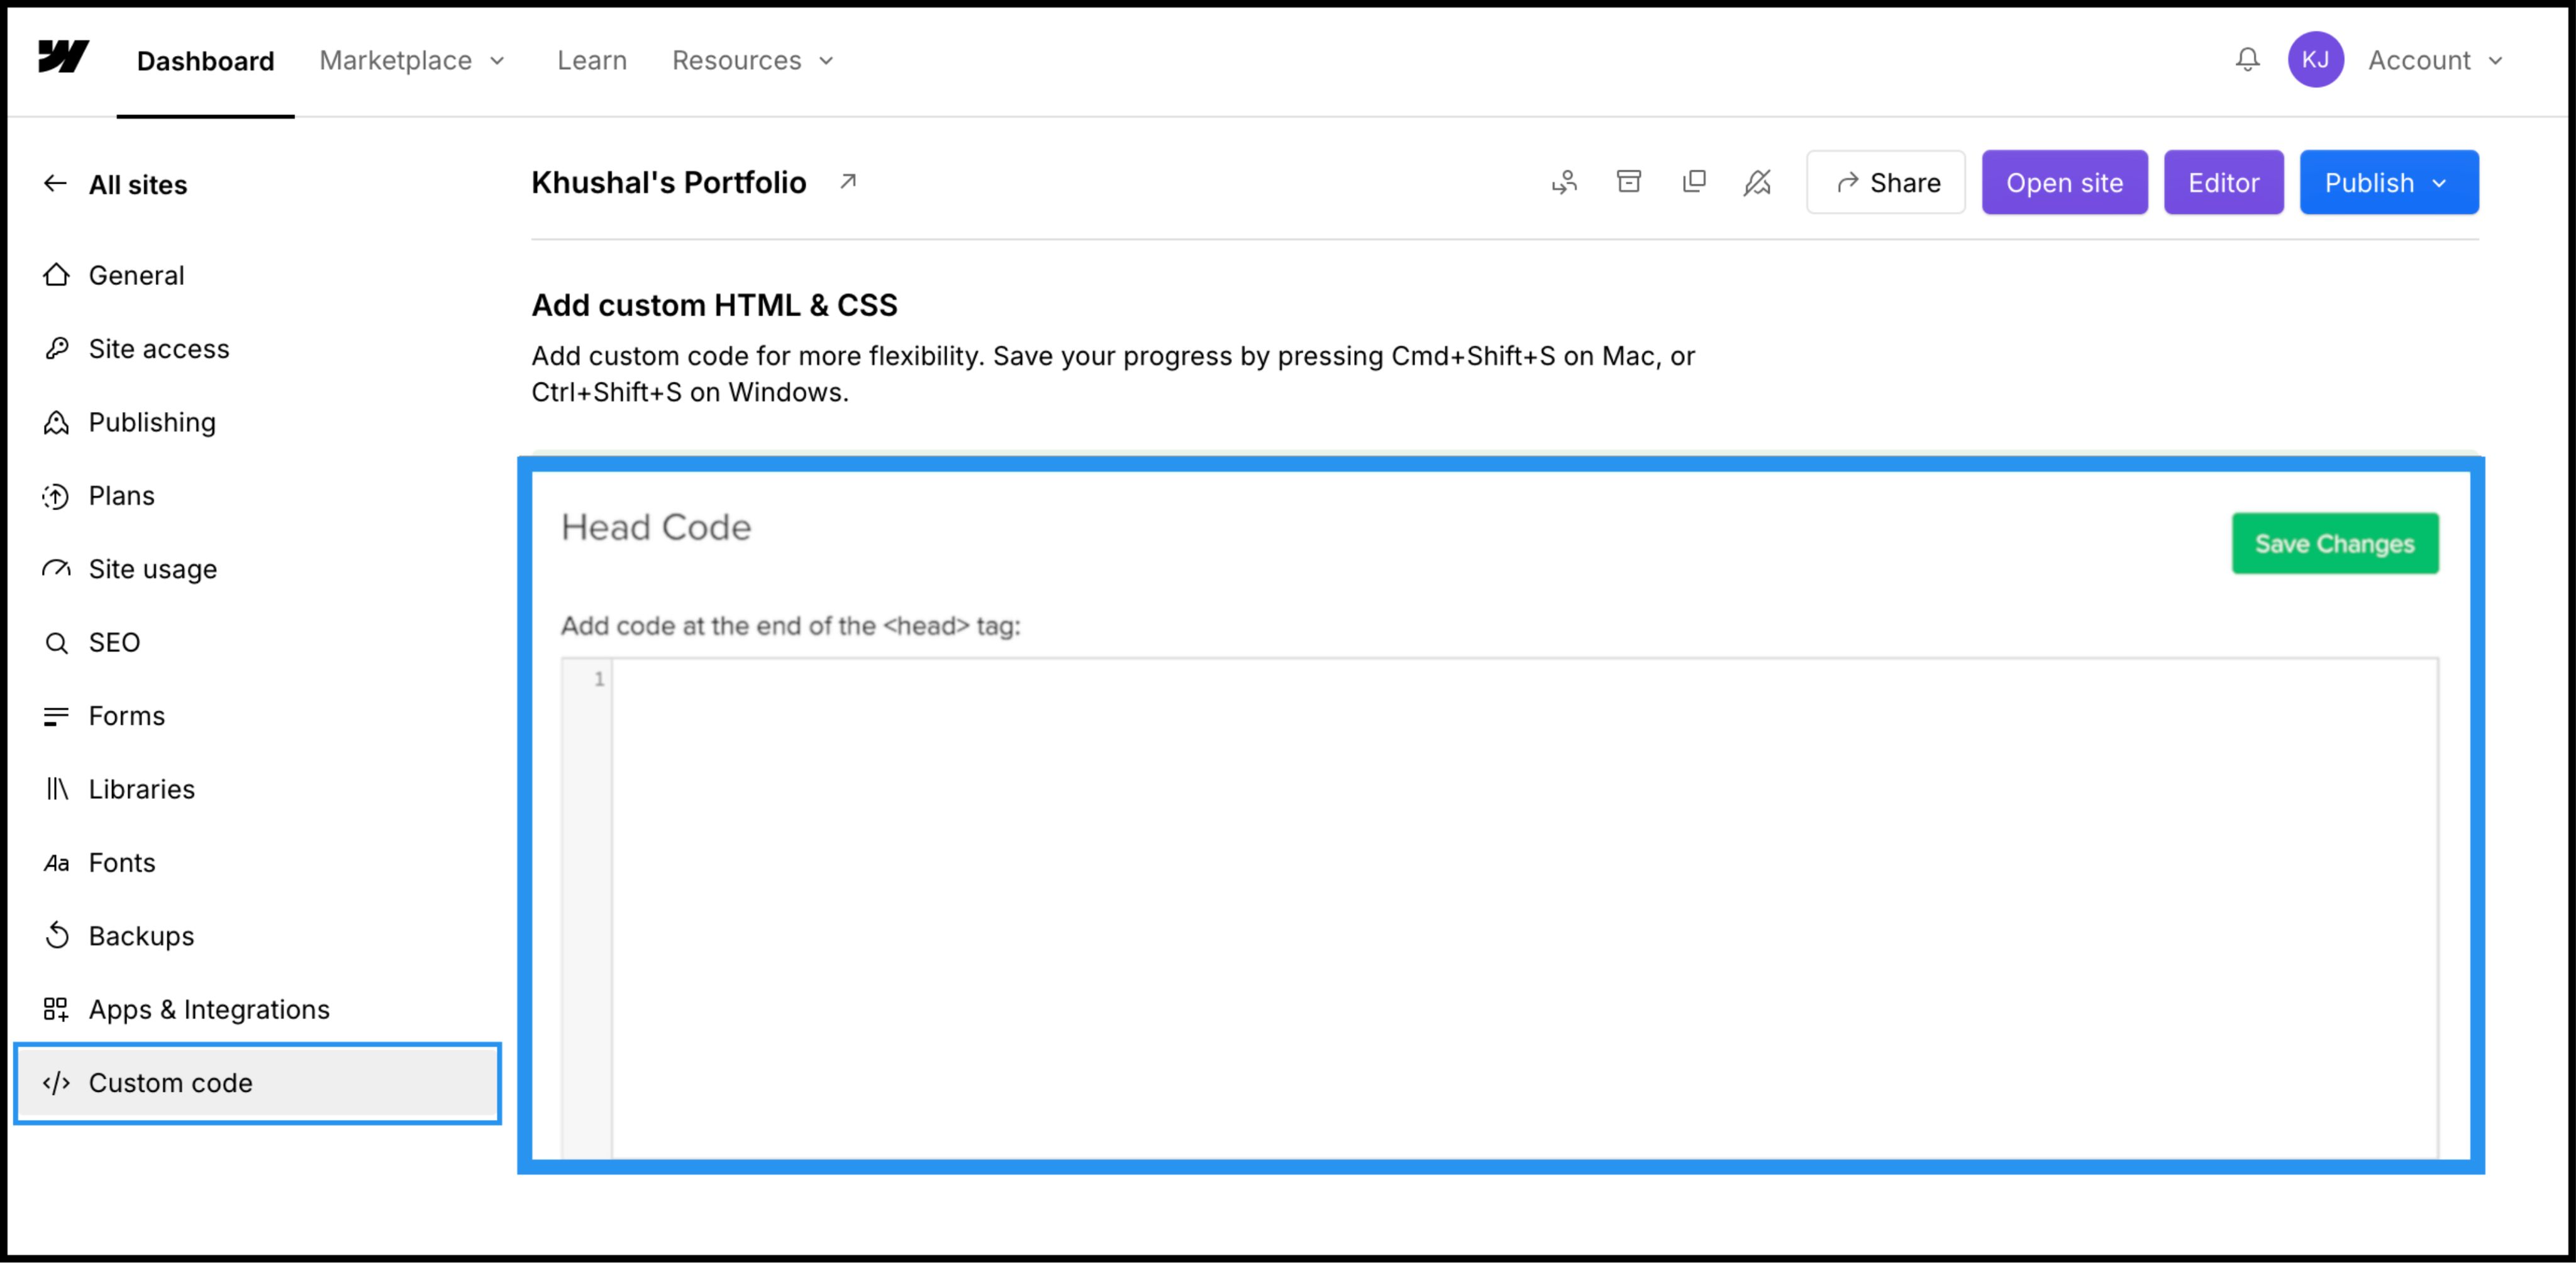
Arahkan ke Kode Kustom tab di bilah navigasi atas.
3. Langkah 2: Masukkan Skrip Infrastruktur
- 1
Gulir ke bawah ke bidang berlabel "Kode Kepala".
- 2
Nota: Jangan letakkan ini di "Kode Footer," karena akan menunda pemuatan terjemahan dan menyebabkan "kilasan konten yang belum diterjemahkan."
Tindakan: Tempel Skrip Koneksi
Tempelkan skrip koneksi berikut ke dalam bidang:
⚠️ Konfigurasi Penting
- •Mengganti
YOUR_API_KEY_HEREdengan Kunci API yang sebenarnya disalin dari dasbor MultiLipi Anda. - •Klik hijau Simpan Perubahan tombol di sudut kanan atas.
4. Langkah 3: Penerapan & Verifikasi
Webflow tidak menjalankan kode kustom di tampilan Desainer. Anda harus mempublikasikan untuk melihat mesin beraksi.
Menerbitkan
Klik tombol biru Menerbitkan tombol dan pilih domain produksi Anda (atau .webflow.io domain staging).
Verifikasi
Buka tautan langsung.
Pemeriksaan Visual
Pengalih Bahasa harus muncul di sudut kiri bawah.
Pemeriksaan CMS
Arahkan ke halaman Koleksi CMS (misalnya, /blog/post-1) dan beralih bahasa untuk memastikan konten dinamis diterjemahkan dengan benar.
Protokol Pemecahan Masalah
- •Pengalih Hilang? Pastikan Anda mempublikasikan situs setelah menyimpan kode.
- •Pemeriksaan Paket: Pastikan paket hosting Webflow Anda aktif; situs staging gratis sering kali membatasi eksekusi kode kustom pada domain kustom.
5. Optimalisasi & Penataan Gaya
Setelah diterapkan, MultiLipi bekerja secara diam-diam di latar belakang.
Integritas Desain
Karena kami hanya menukar node teks, Interaksi Webflow (IX2) dan animasi scroll Anda tetap utuh.
Kustomisasi Pengalih
Anda dapat memposisikan ulang pengalih menggunakan pengaturan Dasbor kami atau mengganti CSS-nya agar sesuai dengan tipografi spesifik situs Anda.
Otomatisasi SEO
Kami secara otomatis menghasilkan sitemap.xml entri dan hreflang tag untuk proyek Webflow Anda, memastikan Anda mendapat peringkat dalam hasil pencarian global tanpa pekerjaan SEO manual.